Thursday, December 22, 2011

Chocolate Crumble Pie


Ryan's grandfather, or Vovo as they call him, recently turned 90 and this is what I brought to his church's potluck celebration.

I made it the day before, with my sister sitting in my kitchen and carrying on in enjoyable sisterly conversation. After I had distractedly gone through my cabinets a couple times I realized that my loose-bottom tart pan was MIA! My sister lovingly helped me go through every cabinet again and think through where it might be...but I've moved so many times that I can't think where it might be. I thought I would find it when I unpacked in our new house a couple weeks ago, but to no avail. That tart pan is still hiding and I just know it will turn up the day after I buy a new one!

Anyway, I had to make do with a springform pan, which did the job, but not beautifully.

People liked the pie anyway, or at least Ryan did. And sometimes that's all that matters. :)

Here's the recipe.

Chocolate Crumble Pie
adapted from Everyday Chocolate

Dough
7 oz or scant 1.25 cups AP flour
1 tsp baking powder
4 oz unsalted butter, cut into small pieces
Generous 1/4 cup sugar (superfine if you have it)
1 egg yolk
1-2 tsp cold water (I ended up using more)

Filling
5 fl oz or 2/3 cup heavy cream
5 fl oz or 2/3 cup milk
8 oz semisweet chocolate, chopped
2 eggs

Crumble Topping
Generous 1/2 cup packed brown sugar
3/4 cup toasted pecans
4 oz semisweet chocolate
1 tsp unsweetened cocoa

To make the pie dough, sift the flour and baking powder into a large bowl, rub in the butter, and stir in the sugar. Then add the egg yolk and a little water until the dough comes together. Turn the dough out and knead briefly. Wrap the dough and let chill in the refrigerator for 30 minutes.

Preheat the oven to 375. Roll out the pie dough ad use to line a 9 in loose-bottom tart pan (if you can find it!). Prick the pastry shell with a fork. Line with parchment paper and fill with dried beans (at this point I couldn't find my special baking beans and have not found them to this day...I'm still convinced someone was trying to sabotage my recipe that day). Bake for 15 minutes. Remove from oven and take out paper and beans. Reduce oven temp to 350.

Bring the cream and milk to a boil in a pan, remove from heat, and add the chocolate. Stir until melted and smooth. Beat the eggs and add to the chocolate mixture. Mix thoroughly and pour into the shell. Bake for 15 minutes, remove from oven, and let rest for 1 hour.

Place the topping ingredients in a food processor and pulse to chop, or chop the nuts and chocolate then add to the other ingredients and crush in a large bowl. Sprinkle over the pie right before serving.


I managed to nab this shot with my phone when I set it out.

Wednesday, December 21, 2011

The Simple Things


Will I leave this world regretting the recipes I never made? Or will my zeal to make as many as I can hasten that day? Is it bad that the main reason I'm looking forward to having kids is so that I'll have more people to cook for and can thus make more things? So many times I have to wait and wait to make recipes since I don't want to make them just for me and Ryan. I mean...if we ate everything I wanted to make, we would balloon up and float away. So I have to stick to the healthy stuff when it's just us two and then take joy in carting fattening hors d'oeuvres and desserts to whatever potluck or family gathering I go to.

The pains of a dietitian who loves to cook.

I feel as if I'm trying to make up for the past month of peanut butter and jelly sandwiches I ate for lunch by making three different things a day since my last final.


So...I made a goal.

I will post every day (except Christmas Eve and Christmas...probably) until I am caught up telling you all about what I've been up to.

Hold me to it!

Whole Wheat Harvest Bread
adapted from Making Fresh Bread by Love Food

Makes one medium loaf or two extra small loaves

2 cups whole wheat flour
1 tsp salt
2 tbsp brown sugar
1 tsp active dry yeast
1 tbsp milk
1.5 tbsp vegetable oil
1/2 cup + 3 tbsp lukewarm water

Whisk together the flour, salt, sugar, and yeast. Make a well in the center and pour in the milk, oil and lukewarm water. Stir well with a wooden spoon until the dough begins to come together, then knead with your hands until it leaves the side of the bowl. Turn out onto a lightly floured counter  (or baking sheet to cut down on mess) and knead well for about 10 minutes, until smooth and elastic. Don't clean up the flour yet!

Brush a bowl with oil. Shape the dough into a ball, put it into the bowl, and put the bowl into a plastic bag or cover with a damp dish towel. Let rise in a warm place for 1 hour, until the dough has doubles in volume.

Spray a 6.5x4.25x3.25" loaf pan with cooking spray...or two extra small pans...which is what I did. Turn out the dough onto a lightly floured counter, punch down with your fist and knead for 1 minute. With lightly floured hands, shape it into the appropriately sized rectangle(s) and flatten slightly. Fold it lengthwise into 3 and place in the prepared pan(s), seam side down. Put the pan(s) into a plastic bag or cover with a damp dish towel and let rise in the warm place for 30 minutes, until the dough has reached the top of the pan. You can clean up the flour now.

Preheat the oven to 425. Bake for 30 minutes (less if using small pans), until it has shrunk from the sides of the pan, the crust is golden brown, and it sounds hollow when tapped on the bottom with your knuckles. Turn out onto a wire rack to cool.

Tuesday, November 15, 2011

Fresh from the Farm: arugula, chard, and potatoes


Last week was the final week of my CSA share. It's been fun learning about some new vegetables and some very interesting recipes have resulted. But I'm not sure if I will do it again next year. I still feel guilty about the many times I threw things out because they went bad before I could use them. And I cannot for the life of me figure out how to store greens without them going limp! Any suggestions??

Here I will share with you some recipes I made that featured the last pickings of the crop.

First up, Arugula Pesto Pasta
I got the pesto recipe from my CSA newsletter:
3 cups packed arugula (about 3/4 pound) washed well and dried
1/3 pine nuts, toasted golden and cooled (I substituted almonds)
1/2 cup freshly grated Parmesan cheese
1/2 tsp salt (I used 1/4)
1 large clove garlic, chopped
3 tbsp olive oil (I used 1.5 tbsp olive oil and the juice from half a lemon)
1/4 cup hot water (I used pasta water)

1/2 lb pasta of your choice

While the pasta is cooking, make the pesto. In a food processor, pulse together all ingredients except oil, lemon juice, and water until chopped fine. With motor running, add oil and lemon juice in a stream, blending until smooth. (Careful with this part! If your processor tends to shake a lot like mine, then it's probably ok to add the oil a little bit at a time, blending after each addition.)

Drain pasta, reserving some liquid, and place in bowl.

Stir 1/4 cup of the hot pasta water into the pesto to loosen. Toss with pasta, adding more water if needed. Combine with a meat, if you desire. I chopped up some leftover Italian-seasoned chicken to add.


Next comes the potatoes. The first thing I made with them was Bacon and Blue Cheese Potato Salad. I have to say, I detest normal potato salad. Actually, my real issue is with the mayonnaise. No, it's not because it is unhealthy, because they have all those low-fat versions now. I have just never liked the taste. If I forget to ask for no mayo at a sandwich place, my lunch is ruined.

So anyway, I decided to make potato salad sans mayo. I forgot to write down the proportions, so please forgive me. It should be pretty easy to eyeball it.

Bacon and Blue Cheese Potato Salad
new potatoes
1 container crumbled blue cheese
3-4 slices bacon
olive oil
balsamic vinegar
small bunch of parsley

Heat a pot of water on the stove. Slice potatoes into consistently sized chunks. Boil until tender. Meanwhile, chop parsley and cook bacon. Crumble. Place potatoes in a bowl. Drizzle a little olive oil and balsamic vinegar down the sides of the bowl and toss. (This allows for more even coverage and lets you use less.) Mix in blue cheese, parsley, and all but 1-2 tbsp bacon bits. Top with remaining bacon and serve warm or chill and serve cold!


I also got some delicious yukon gold potatoes and used them in another recipe provided by the newsletter. I thought it was good. Ryan thought it was good. But it looked...strange. Just a warning.

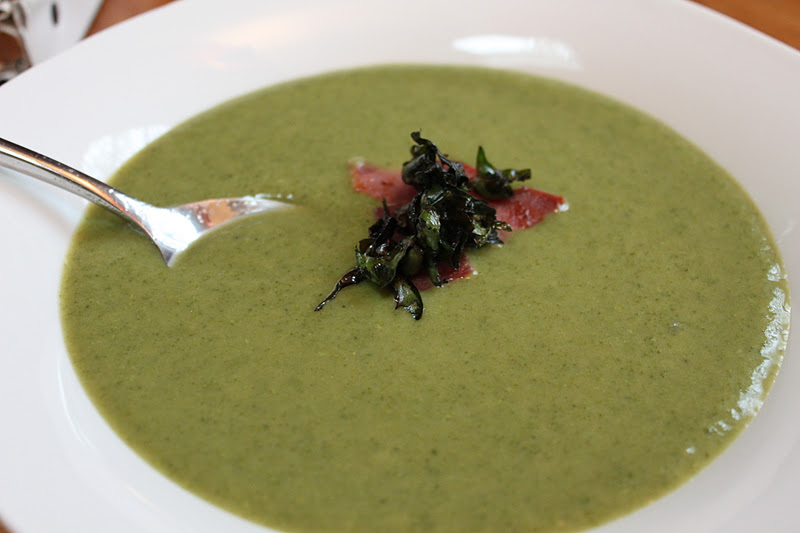
Chard and Potato Soup
2 tbsp butter
1 cup onion, chopped (I omitted this for Ryan's sake)
1 bunch swiss chard, trimmed, leaves and steams chopped SEPARATELY (makes 6 cups chopped leaves)
2 cups yukon gold potatoes, peeled, diced
4 cups chicken stock
1 cup milk
salt and pepper
For garnish: 1 tbsp vegetable oil, 1/4 cup swiss chard, 2-3 slices cooked and crumbled bacon

Heat butter in a pot over medium heat. Add swiss chard stems (and onion, if using) and saute for 2 minutes or until softened. Add potatoes, chicken stock, and milk and bring to a boil. This is when it turns pink if you used any red swiss chard.

Simmer soup for 5 minutes. Add leaves (reserving 1/4 cup for garnish) and simmer 5 minutes longer or until potatoes are very soft and chard is wilted.

Puree soup with blender, food processor, or an immersion blender (greatest invention on earth!!). This is when it turns green. Season with salt and pepper.

For garnish, heat oil (or if using bacon, just use leftover grease) in a small skillet over medium high heat. Add swiss chard (be careful! it will splatter!) and fry for 1-2 minutes or until crisped. Drain on paper towels.

Garnish and enjoy!

Sunday, November 13, 2011

Chocolate Peanut Butter Layer Cake with Peanut Brittle


We are going to go waaaaay back and take a look at a cake I made in September for my mom's birthday. I couldn't let this one slip by. It was a moist chocolate cake with creamy peanut butter filling, tangy frosting, and spectacular peanut brittle.

In case you're wondering..the camera connector cord thingy decided to take a vacation...hence the long break between posts.

I got this recipe from one of my favorite cookbooks, A Year in Chocolate by Alice Medrich. I look back on the arrival of the book with fond memories as I received it in the mail the day I got engaged, February 6th, 2010. I thought I was meeting up with Ryan to go car shopping and he was a little late (getting ready to propose, I now know!), so I read it in the car while I was waiting.

Anyway, everything I've made from it has been wonderful. This particular recipe is called Chocolate Peanut Butter Layer Cake.


First, you gotta make the brittle. As a side note, don't let the technicality of this recipe scare you. It's just simple numbers, a good chunk of time, and a little bit of patience.

Peanut Brittle
1/2 cup chopped peanuts
1/2 cup sugar
1/4 cup water
1/8 tsp cream of tartar

Have the nuts, a wooden spoon or silicone spatula, a white plate, a skewer or spoon, a small bowl of water, and a pastry brush or paper towel ready at the side of the stove. Things are going to happen fast! Also spray a foil or parchment lined baking sheet.

In a 3-4 cup saucepan, combine the sugar, water, and cream of tartar. Stir gently (don't whisk, please) over medium heat until most of the sugar looks dissolved. Stop stirring and bring to a simmer. Cover and simmer for 2-3 minutes. Uncover and wash down the insides of the pot with a wet pastry brush or a wet wad of paper towel. Continue to simmer until it begins to color. Swirl the pot instead of stirring if it is coloring unevenly.

Use the skewer or spoon to drop a bead of syrup on the plate. When a drop looks pale amber, add the nuts and turn gently with a wooden spoon or silicone spatula until completely coated. Continue to cook without stirring until a drop of syrup looks reddish amber.

IMMEDIATELY scrape the mixture onto the baking sheet and spread as thin as possible. Let cool and harden. Break into shards or chop. Congratulations! The hardest part is done!

Cake
All ingredients should be at room temp.
1 1/4 cups AP flour
2/3 cup unsweetened Dutch process cocoa powder
3/8 tsp baking powder
3/8 tsp baking soda
1/2 tsp salt
1/2 cup sour cream or plain yogurt
16 tbsp unsalted butter, slightly softened
1 1/4 cups sugar
3 large eggs
1 1/2 tsp vanilla

Prepare two 8 inch round layer cake pans by lining on the bottom with a round of parchment paper and spraying it and the sides with baking spray. Position the rack in the lower third of the oven and preheat it to 350.

Sift the flour, cocoa, baking powder, baking soda, and salt together 3 times. Yes. 3 times. Set aside.

Combine sour cream with 1/4 cup water and set aside.

In a medium to large bowl with an electric mixer, beat the butter for a few seconds until creamy. Add the sugar in a steady stream and continue to beat (at high speed if you have an old school hand mixer like me or medium speed if you have a fancy schmancy stand mixer) until light and fluffy, about 4 minutes.

Next, break the eggs into a small cup, add the vanilla, and whisk to combine. Beat the eggs into the butter mixture gradually, taking 1.5 to 2 minutes, beating constantly.

Stop mixing and add one third of the flour mixture to the bowl. Beat on low speed only until no flour is visible. Stop mixing and add half of the sour cream. Beat only until blended. Repeat with half the remaining flour mixture, then all of the remaining sour cream, then the rest of the flour. Stop mixing each time you add something, then beat on low speed just long enough to incorporate the ingredients.

Divide the batter between the pans and spread evenly. Bake until the cake starts to shrink away from the sides of the pan and a toothpick comes out clean, about 25-30 minutes. Cool the cake in the pan on a rack for 5-10 minutes before attempting the nerve-wracking flip. Then...flip each layer onto a rack and peel off the parchment (glad you put those in there now, aren't ya?). Turn the layers right side up and cool completely.

If you want to do this ahead, you can make the layers, wrap them tightly, and keep at room temp for 1-2 days or frozen for 3 months.

Filling
2/3 cup natural smooth peanut butter
1/4 tsp vanilla
1/3 cup powdered sugar
4 tbsp unsalted butter, slightly softened

Beat the peanut butter, powdered sugar, and butter just until blended and smooth. When the cakes are cool, turn one layer upside down on a platter or on a cardboard circle. Spread the filling evenly over the cake. Top with the second layer, right side up.


Finally, make the frosting.

Frosting
5 oz semisweet chocolate
2/3 sour cream (If you try to get by with a normal 4 oz chocolate bar, this will get really tangy. Don't say I didn't warn you.)

Melt the chocolate in a double boiler (put the chocolate in a small bowl and set in a pan of barely simmering water). Stir frequently until smooth. Or if you're a risk taker, microwave on medium for 2.5-3 minutes, stirring every now and then. Off heat, scrape the sour cream on top of the chocolate and stir just to combine. Use IMMEDIATELY to frost the top and sides of the cake. If it gets too stiff or loses its gloss, set the bowl in a pan of hot water for a few seconds to soften. Decorate the cake with the peanut brittle and keep at room temp. Hopefully it will be eaten without you having to throw it out in 3 days. Or you could do an experiment and freeze it.